Gas Powered Scooter For Adults With Seat – Assembly

1. Assembly Instructions
The majority of the scooter is going to be assembled. It’ll be folded like this in the box. All you have to do is basically bolt on the handlebars. Remember to tighten all Nuts, Bolts, and Screws in case they have loosened in transit.

2. Handlebars Assembly
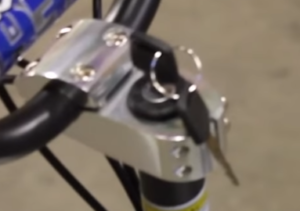
So, first, I’m going to show you there’s a lever here that you will pull down, and this will allow you to pivot the handlebars up, and you’ll notice those will lock into place. And then you will set the handlebars onto the post here, position them straight with the front wheel, and then there’s simply two Allen bolts, so make sure you get these nice and tight so your handlebars can’t spin on you.
3. Seat Installation
Next, let’s take a look at the seat. This does come with a quick-lock seat, so you will remove the finger bolt here, you’ll open this up, and you’ll just simply slide this into the deck, pull this back, it’ll latch the front here, and then tighten down the bolt to secure. Now, of course, this seat is optional; you can stand up or have it attached.
4. Brake Lever and Throttle Adjustment
We have front and rear brake levers. We like to adjust these to be horizontal and right below that. This is actually the finger throttle. We like to tilt this one just slightly down for writing. To have these really close, basically.
5. Key and Ignition Functionality
You have your on and off key. Now, the way the key works is this is just a kill switch. So when the key is off, that actually shorts out the spark plug on the motor, so you can’t start it. So, if the scooter will not fire up for you, definitely make sure you have your key on.
6. Shifter and Gear Selection
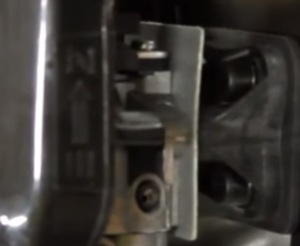
On the left side here, we have the shifter. Now, if you take a look, we have a low and a high. When you push the bottom lever, it’s going to push in hard because it has to pull stiff on the cable. And then you let go, and it’s actually going to click and hold. And now the indicators are in the middle of the window. We never push this over too high, even though the shifter can be shifted twice and the indicator can move over. It’s really only meant to be pushed once. Now we’re in second gear when you’re driving. Simply push the top one. That’ll release us back to first gear. Now, you don’t have to let off the gas to shift. You can just push and shift whenever you want.

7. Brake Caliper Adjustment
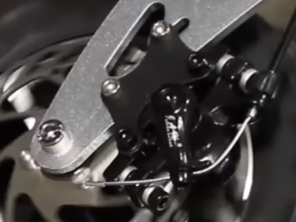
About adjusting the brakes, these brake calipers are a little bit different than your standard scooter. If you need to get more adjustment on the scooter, this is the lever that pulls inward when you pull the brake cable. You can simply loosen the bolt that squeezes the cable, pull the cable through a little bit more, retighten it, and that’ll tighten up your brake. You can also adjust on the brake levers just like on a bicycle. You can adjust the tension of the cable there as well.
8. Wheel Inspection and Maintenance
Obviously, once the pads wear down, you just buy new pads and replace them. Another thing, both wheels should spin freely like this, where the pads are not rubbing on the disk. This one’s just a little different than the standard caliper. These two bolts that hold it, these Allen bolts, you loosen those. Now, you can slide the caliper in and out to make sure you center the pads around the disk so there’s no friction there and make sure the wheel spins smoothly.
9. Folding and Carrying the Scooter
Now, just to fold the scooter down, just like we put it up, you’ll pull this lever back. One important thing to note is make sure you have a hand on the top of the handlebar when you pull this down. Otherwise, this can drift down and hit you in the head. What’s nice is when it locks back down, you can actually grab the handle of our post and carry this handle.

10. Starting the Scooter
Starting the scooter, this is a two-stroke engine, so that means you have to mix gas with the oil. If you run straight gas, the motor will last just and you’ll need to replace the motor. To mix your gas and oil, you will get a mixing container. We recommend mixing at a 32:1 ratio. If you look on the container here, here’s how to use it. You’re going to fill the tank up with gas up to the 1100 mark, which is basically the second notch down, and then you’re going to pour two-stroke oil until it reaches the top line. And then simply shake it up, pour it into your gas tank. Now, you can premix one 2.5-gallon gas tank in your garage. Just mix four ounces of oil per one gallon of gas. That way, you can just keep filling up and you don’t have to mix the tank each time.
11. Fuel Mixture and Gas-Oil Ratio
To mix the gas and oil, use a 32:1 ratio… 32 parts gas to 1 part 2 stroke oil.
12. Priming and Choke Operation
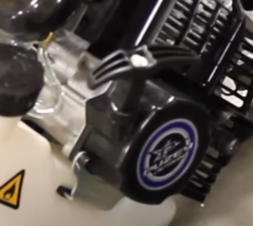
To start the scooter, make sure the key is on. Take a look here, just like any two-stroke motor, like a quad or a dirt bike or a chainsaw, you’re going to want to push the primer bulb. So the primer bulb is underneath the carburetor. You’re going to want to push this at least six times, or until you can see all the gas flowing through the lines. If you don’t do this, it’s going to take forever to start because there’s no fuel in the carburetor. And, of course, if you can’t get any gas up, make sure you have enough gas in your tank. Sometimes the gas line does not reach to the very bottom of the tank.
13. Air Filter Maintenance
Under here is the air filter. You can just simply remove this finger screw, pull off the cover, and you have your air filter there if you ever want to check it. If you’re riding in dusty areas and you need to clean it.
14. Pull Start Tips
A few things about the pull start. If you’re rough with these pull starts, they will break very quickly. So, there are a few things to know. When you grab the pull start handle, we like to pull out slow just like this until it grabs the engine. And now we’ll make our starting pull. If you don’t do that and you just start pulling really hard, it jerks against the engine, the pull start’s going to break a lot quicker. Another thing, don’t pull this handle out too far. It should only need to come out about a foot. If you start going further, you’re going to get to the end of the rope and it’s going to break in at the inside off. And same thing when you pull it out, don’t ever let it slap back in like that. Don’t ever let it go because that can make the spring pop off. So just try to let it back in by hand.
15. Carburetor Adjustment
Now, if your engine is not running well, if the gas doesn’t want to go, seems like it’s bogging down, then you’re going to want to adjust the fuel mixture screw on the engine. Now, we’re going to show you this at the end of the video. We’ll fire it up, we’ll show you how that works and how to adjust it.

16. Chain Adjustment Bolt Under Deck
Now, we’re going to show you how to adjust the chain and the belts. So, on most scooters on the market, the rear axle can actually be adjusted forward and back to tighten the chain. On this model, the axle is solid in the back, and there’s going to be this one tension bolt underneath the bottom of the scooter here. You can see it. So how this works is when you tighten this bolt, it’s going to pivot this arm forward, which moves the gearbox forward, hence tightening the chain. So you’ll see there’s also a locking nut here. So first, you loosen the locking nut, tighten in the Allen bolt, and then tighten the locking nut back up. Now, you don’t want to make the chain too tight. It should just be lightly snug. It will stretch over time. Once it stretches too much, you’ll notice it’ll start to eat away the teeth on your sprocket. That’s definitely time to get a new chain and replace that.

17. Belt Adjustment
Next, we’re going to talk about the belts because this is a two-speed scooter. We have two belts, one belt for first gear, one belt for second gear. The rear fender just simply pops off. Something new the factory added was this cover around the belt drives. I personally like to take the cover off and leave it off. That way, you can see when the belts stretch and when they need to be adjusted, and the cover has to be off to adjust those as well. So I’m going to take this cover off. We’ll write back a few moments later.
Alright, so now we’re going to show you how to adjust the belts. So, just like the chain, the belts will also stretch over time and need to be adjusted. We recommend keeping up on the belts. If you let the belts get too loose, they will actually skip on these pulleys and they will snap and break. And then it’s a lot harder to replace the belts than it is the chain.
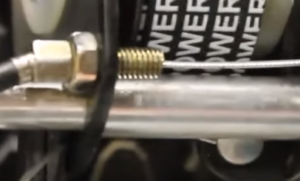
So first things first, on the left belt, on the upper side of this, you’ll see this little short bolt going through here. So, you’re going to want to loosen this bolt, and then you’re going to take something like an extra tool, a screwdriver, and you’re going to wedge this horizontal upward. And you’ll see with these plastic pieces, it’s going to pivot this whole top shaft up, which is going to tighten both belts. Try to keep this horizontal rod basically straight across and horizontal. If you have the left or the right up too high or twist it to try to get one belt tighter than the other, that will make things wear out, especially the bearings. So try to keep it straight. One belt will sometimes be tighter than the other. That’s normal just because you’ll drive usually in second gear more than you do in first.

Next, let’s take a look at where the two-speed shifter connects to the bottom. So if you look, this cable is coming from your thumb shifter on the left hand, and it comes out. It’s going to wrap around this black disc, and then go back to a solid bolt where it’s squeezed. So when you do shift into second gear, you can see this cable is going to pull this black arm. Now, this black arm pushes this pressure plate into the side of some clutch pads that are on the inside of this pulley. Once those clutch pads are squeezed and held, that’s actually going to make the gearbox switch over to the second-speed belt, and then that’s going to put you in a second gear. And then, of course, when you release the shifter, this arm is going to bend over, takes pressure off the pressure plate, and then go back to the first belt and have you back in first gear.
Now, if you ever give it gas when you’re in second gear and it seems like it slips, that usually means the clutch pads in here slipping. Either this arm is not tight enough, which you would just want to tighten this cable, or those clutch pads inside have worn down and you need to replace them. So it’s always important as this cable stretches to when you’re shifting into second gear, if this is not tight, come back and tighten that. You can see we got this bolt here. You can adjust this. We’ll tighten it. If you can’t get enough adjustment, then where the end of the cable attaches, just like it does on a brake, you’ll loosen that bolt, pull the cable through more, and retighten it.
18. Kill Switch and Spark Plug Check
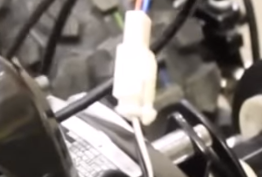
Now, if you have any problems starting the scooter, let’s take a look here. You’ll see these two wires coming on the top of the motor. These are the kill switch wires. These actually come from the key. So sometimes this key wire can get shorted between the frame, and then, of course, you get no spark and you can’t start it. So if you disconnect this connector, that’ll actually bypass the key. Then see if the scooter will fire up. If it does, then you know that the key switch or the key wire is the problem.
Another thing to check is the top of the spark plug cable. Pop this off. Make sure the metal end is in there. Make sure it’s pushed all the way down so you’re getting spark. If you need to check for spark, pull this cover off. Remove the spark plug. Plug it back into the cap, and then just let the top of the spark plug rest on the top of the motor. Then pull the pull start, and you should see a spark. Of course, make sure the key is on or the kill switch is disconnected. If you don’t see a spark, then generally, the ignition coil is bad, and you can replace the ignition coil. Or it could be a bad plug as well.
19. Fuel Mixture Screw Adjustment
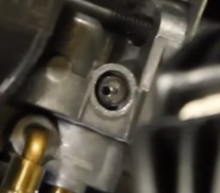
If you let the scooter sit for a long time, you may need to replace the carburetor as well. But generally, the carburetor just needs to be adjusted. If you can’t even get the scooter started enough to adjust the carb screw, that fuel mixture screw on the side, then we can just try to set it back to default, and then you can at least get it running, and then you can adjust it from there. So just take the screw with your special tool, Pacman tool, the new one uses this tool, a circle with a dot in it. So you’ll need to get this tool, and what you can do is turn the fuel mixture screw all the way into the right until the screw stops, and then back it out to one and three-quarters of a turn. And that should be enough to get you started, and then you can adjust from there
20. Engine RPM Optimization
So next, we’ll move this outside, fire it up, and I’ll show you how to adjust the fuel mixture screw. Now, before we adjust the fuel mixture screw and explain what we’re doing, once I fire the engine, you won’t be able to hear me. We’ll get the motor started, warmed up, and then what we’re going to do is we’re going to hold the throttle wide open, and then we’re going to adjust the screw. So before we do that, we always like to put this scooter in second gear. We found that the fuel mixture screw adjusts a little bit better when the engine is under a load. So we always like to put it in second gear. That will make it a little harder to spin the wheel so we get a better adjustment.
Now, the idea is once it’s running and it’s wide open, we’re going to start turning this fuel mixture screw counterclockwise, which is outward. And we want to slowly go outward until the engine’s RPM starts to slow down and the engine starts to run boggy. That means we’re running too rich, and that’s kind of where we want to start. Once we know that, we can tell it’s running boggy, then we’re going to slowly turn the fuel mixture screw inward, which is going to make the engine run more lean. And the idea is to just slowly keep turning it until you reach max RPM. You don’t want to go past that point because then you’ll run the engine too lean. It’ll get too hot and can wreck the motor.
So what I’ll do is I’ll do it a few times. I’ll take it down to a boggy state. We’ll slowly go up until we hit full RPM. And if you go too far, then the engine will actually slow down and want to cut out too if it’s too lean. So I’ll do it a few times. You can kind of see right where we set it. And this is the best way to tweak it. The engine will take three to four full tanks of gas to be fully broken in, so you may have to adjust it again to get top speed out of it. But here we go.
There you go. You can see we turned it outward, we definitely lowered the RPMs, made the engine run boggy. We turned it up, make it lean, to where we got max RPM. You may have to play with that a few times. You may have to turn it inward a little too far to know that here at the highest RPMs when it starts to run bad, and then go back to rich again and start.
WARNING:

Before you go Enter the Draw for the Bugatti Electric Scooter Draw Here:
Ebikes Worth Mentioning Click Here
Back to Top
To use our purchasing process you must be 18 years of age or older to purchase any product on our website and not represent or purchase on behalf of anyone under this age as set at the point of purchase. The scooter will be registered on our database to the Name and Address etc of the purchaser.
This post or page may contain affiliate links that may earn a small commission at no additional cost to you. I use affiliate links because they allow me to share useful products and services with you that are related to the topic of my website. Affiliate links also help me earn some income from my website, which enables me to keep creating high-quality content for you. I appreciate your support and trust!
- Health Benefits of Electric Bikes
- What to Look for When Buying an E-bike
- Best Electric eBikes for Your Little One
- How to Safely Unlock the Top Speed on Unagi Electric Scooters
- Breaking: The Shocking Truth About E Scooter Laws in WA!
- Can You Ride Scooters On The Road “California”
- Can Electric Scooters Get Wet? Yes!
- How do I transport my electric scooter in a car?
- Top 6 Long Range Electric Scooters
- Two-Stroke or Four-Stroke? Gas Scooter Showdown